

Table of Contents
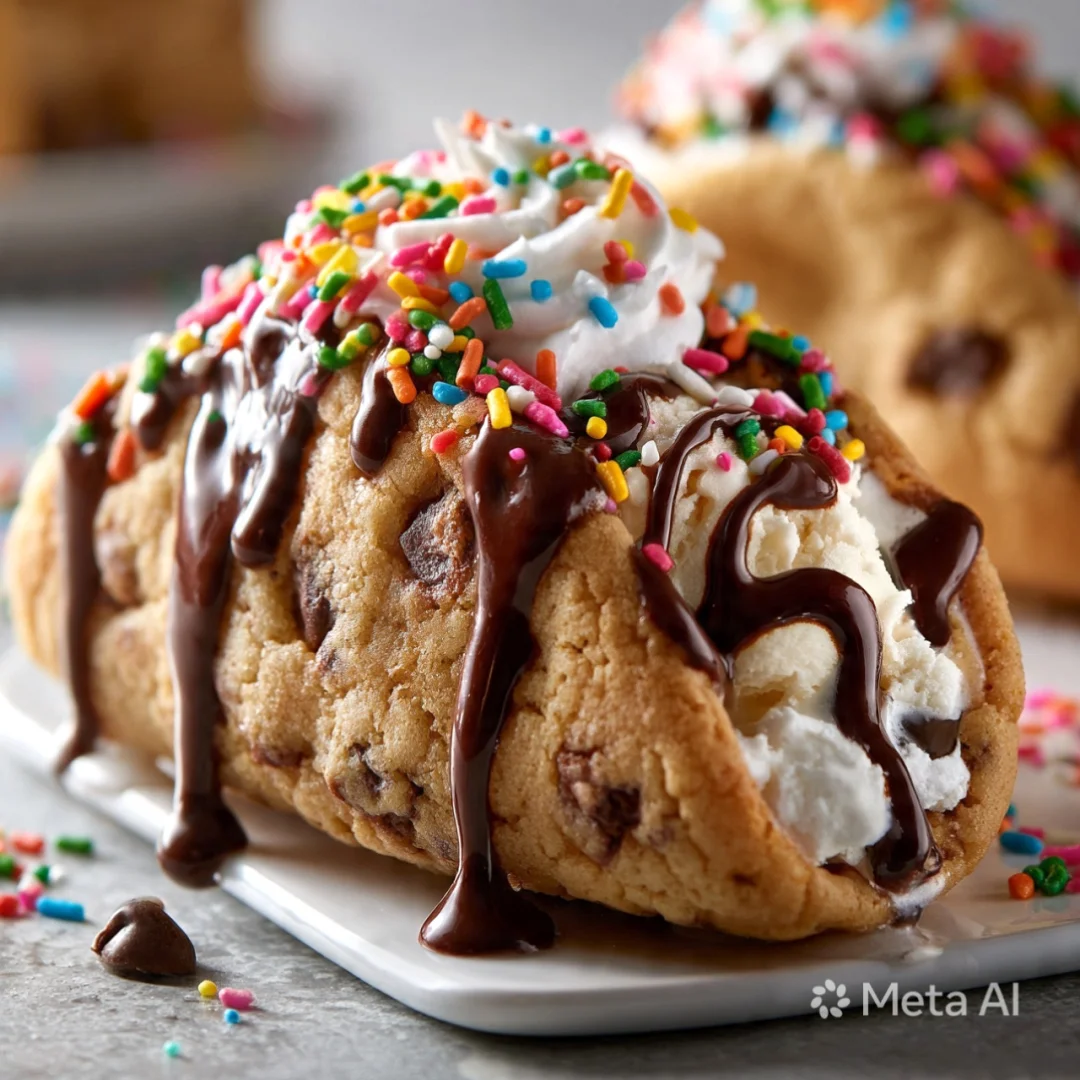
Chocolate Chip Cookie Tacos
When you think of desserts, you might not immediately picture a taco, but prepare to have your taste buds delighted! Chocolate chip cookie tacos are a delicious fusion of classic flavors that offer a fun twist on traditional tacos. Imagine a crispy, sweet chocolate taco shell, overflowing with creamy fillings and topped with your favorite garnishes.
This innovative dessert has taken the culinary world by storm, blending the joy of cookies with the playful nature of tacos. Not only do they provide a unique eating experience, but their whimsical presentation also makes them a fantastic conversation starter at any gathering. The great thing about chocolate chip cookie tacos is that they are not just visually appealing; they are incredibly versatile and can be customized to fit any occasion—perfect for parties, family gatherings, or simply as a delightful treat at home.
You can even get creative with the fillings based on the season or holiday, incorporating festive flavors that will elevate any gathering. Personal anecdotes often highlight how these delightful tacos can bring people together over shared smiles and laughter. Let’s dive into this easy cookie taco recipe and discover how to create these mouthwatering dessert tacos!
Ingredients
- For the chocolate taco shells:
- 1 cup all-purpose flour
- 1/2 cup unsweetened cocoa powder
- 1/2 teaspoon baking soda
- 1/4 teaspoon salt
- 1/2 cup unsalted butter, softened
- 1/2 cup granulated sugar
- 1/2 cup brown sugar, packed
- 1 large egg
- 1 teaspoon vanilla extract
- For the filling:
- 1 cup whipped cream or whipped topping, preferably stabilized to maintain its texture and prevent it from wilting
- 1/2 cup chocolate chips (semi-sweet or milk chocolate; feel free to use dark chocolate for a richer flavor profile that complements the sweetness)
- 1/4 cup peanut butter (optional; creamy or crunchy, depending on your preference and texture desired)
- Fruits like bananas, strawberries, or cherries (optional; fresh fruits add a bright, refreshing contrast to the sweetness and enhance the overall flavor)
- For the toppings:
- Chocolate sauce or caramel sauce, for a decadent drizzle that adds richness and visual appeal
- Sprinkles, in your choice of color to match the occasion or theme of your gathering
- Crushed nuts (e.g., walnuts or almonds) for added crunch and flavor that enhances the texture
- Shredded coconut (optional; unsweetened coconut adds a nice tropical flair and chewiness)
When selecting your ingredients, opt for high-quality chocolate for the taco shells to enhance the overall flavor experience. Using premium ingredients can make a significant difference in the final product, elevating these cookie tacos from simple treats to extraordinary desserts. You can also experiment with different fillings and toppings to suit your personal taste or occasion, such as adding flavored syrups like raspberry or caramel sauce, or even alternative nut butters like almond or cashew for a unique twist. Each ingredient contributes not just to the overall flavor but also to the texture and mouthfeel, making every bite a delightful surprise. You can learn more about this topic.

Steps / Instructions
Preheat the oven: Preheat your oven to 350°F (175°C). This ensures that the taco shells bake evenly and become crisp, providing the perfect foundation for your delicious fillings. Using an oven thermometer can help ensure accuracy, as oven temperatures can vary. Preheating is essential; without it, your baking results may not achieve the desired texture and flavor.
Mix dry ingredients: In a medium bowl, whisk together the flour, cocoa powder, baking soda, and salt until well combined. This step is crucial as it ensures an even distribution of the dry ingredients, which will help in achieving a uniform texture in the shells. Set this mixture aside, allowing the dry ingredients to settle and mix well. A good tip is to sift the cocoa powder before adding to avoid lumps, ensuring a smoother batter.
Cream the butter and sugars: In a large mixing bowl, use a hand mixer or stand mixer to cream together the softened butter, granulated sugar, and brown sugar until light and fluffy, about 3-4 minutes. The creaming process incorporates air into the mixture, giving the taco shells a light and tender crumb. If you notice lumps of sugar, continue mixing until the mixture becomes smooth. This step is where texture begins, so don’t rush; aim for that light, airy quality that makes cookies delightful.
Add the egg and vanilla: Beat in the egg and vanilla extract, mixing until fully incorporated. This addition provides moisture and flavor, enhancing the overall taste of the taco shells. You can enhance the flavor further by using pure vanilla extract or even experimenting with flavored extracts like almond or orange. The egg also serves as a binding agent that helps create the right dough consistency.
Combine wet and dry ingredients: Gradually add the dry mixture to the wet ingredients, mixing until just combined. Be careful not to overmix; you want to maintain a soft dough consistency that’s easy to work with but without developing too much gluten, which could lead to tough shells. A quick fold with a spatula can also help keep the dough airy. If the dough feels too sticky, letting it rest for a few minutes can help firm it up slightly.
Shape the taco shells: Scoop about 2 tablespoons of dough and shape them into small balls. Place them on a baking sheet lined with parchment paper, flattening each ball slightly into a disc shape. Make sure to leave enough space between each cookie to allow for spreading while baking, approximately 2 inches, to avoid them merging together. Here’s a tip: dampen your hands slightly to prevent sticking while shaping the dough.
Bake the shells: Bake in the preheated oven for 10-12 minutes, or until the edges are set but the centers are still soft. They will harden as they cool, creating the perfect texture. For an authentic taco shape, you can drape the baked cookies over an oven-safe bowl to cool; this creates a nice curve that mimics a taco shell. Keep an eye on the cookies as they bake, as oven times can vary based on the size of the cookies. A visual cue to look for is a slight puffing of the centers; they should not be completely flat.
Prepare the filling: While the taco shells cool, combine the whipped cream and chocolate chips in a bowl. If using peanut butter, fold it into the mixture for added flavor and a creamy texture. Feel free to add in chopped fruits for additional texture and taste; this not only enhances flavor but also adds freshness and color to the filling. A good tip is to chill your mixing bowl before whipping cream; this helps achieve a firmer texture faster.
Assemble the tacos: Once the chocolate taco shells have cooled completely, fill each shell generously with the whipped filling. Be creative with the amount—more is definitely better! Ensure you don’t overfill to the point where it spills out, as this can make the tacos difficult to handle. Consider using a piping bag for a more elegant presentation, allowing for precise filling that looks professional and inviting.
Add toppings: Drizzle your chocolate or caramel sauce over the filled tacos, then sprinkle with your choice of toppings such as crushed nuts, sprinkles, or shredded coconut. This is the fun part where you can really let your creativity shine and even coordinate the colors of your toppings with the occasion! Take a moment to step back and admire your handiwork; presentation can elevate the entire dining experience.
Serve and enjoy: Serve immediately for the best texture and flavor, and watch as your guests marvel at this unique dessert! The contrast of warm taco shells with the cold filling creates an irresistible experience that is sure to be a hit at any gathering. Encourage your guests to get adventurous with their toppings for a truly interactive dessert moment!
Tips & Tricks
- Storage: If you have leftover cookie taco shells, store them in an airtight container at room temperature for up to 3 days. However, it’s best to fill them just before serving to maintain their crispiness, as moisture from the filling can make them soggy. If you need to store filled tacos, consider placing a paper towel in the container to absorb excess moisture. This little trick can make a big difference in preserving the quality of your dessert.
- Make-ahead options: You can prepare the taco shells a day in advance. Just store them in an airtight container once completely cooled. Prepare the filling the day of serving for the freshest taste, ensuring that the whipped cream retains its airy texture. If you want to save time, consider pre-measuring your ingredients or even preparing the filling a day in advance. This prep work can make assembly a breeze when it’s time to serve.
- Avoiding common mistakes: Ensure that your butter is softened but not melted, as melted butter can lead to greasy taco shells. Also, be mindful of not overbaking; the shells should be soft in the center to achieve that perfect texture. Keep an eye on them in the last few minutes of baking to avoid overcooking and resulting in a crunchy shell. Testing with a toothpick can help; if it comes out with moist crumbs, you’re good to go.
- Pro technique: For an extra touch, consider lightly dusting the finished tacos with powdered sugar for added sweetness and presentation. This not only enhances the visual appeal but also adds a nice touch of sweetness without overpowering the flavors. You can also consider garnishing with fresh mint leaves to add a pop of color and freshness, making your dessert visually stunning and inviting!
Conclusion
Chocolate chip cookie tacos are the perfect blend of creativity and indulgence, making them an ideal choice for any celebration or a sweet treat at home. With their crispy shells and customizable fillings, these dessert tacos are sure to be a hit among kids and adults alike. Don’t hesitate to experiment with flavors and share your own variations! Get ready to impress your friends and family with this delicious fusion dessert. Check out our related guide for more tips.
Chocolate Chip Cookie Tacos
A fun twist on traditional tacos, these chocolate chip cookie tacos offer a delicious fusion of classic flavors and are perfect for any gathering.
Ingredients
- 1 cup all-purpose flour
- 1/2 cup unsweetened cocoa powder
- 1/2 teaspoon baking soda
- 1/4 teaspoon salt
- 1/2 cup unsalted butter, softened
- 1/2 cup granulated sugar
- 1/2 cup brown sugar, packed
- 1 large egg
- 1 teaspoon vanilla extract
- 1 cup whipped cream or whipped topping, preferably stabilized
- 1/2 cup chocolate chips (semi-sweet or milk chocolate)
- 1/4 cup peanut butter (optional)
- Fruits like bananas, strawberries, or cherries (optional)
- Chocolate sauce or caramel sauce for drizzling
- Sprinkles for decoration
- Crushed nuts (e.g., walnuts or almonds)
- Shredded coconut (optional)
Directions
Preheat your oven to 350°F (175°C).
In a medium bowl, whisk together the flour, cocoa powder, baking soda, and salt until well combined.
In a large mixing bowl, cream together the softened butter, granulated sugar, and brown sugar until light and fluffy, about 3-4 minutes.
Beat in the egg and vanilla extract, mixing until fully incorporated.
Gradually add the dry mixture to the wet ingredients, mixing until just combined.
Scoop about 2 tablespoons of dough and shape them into small balls. Place them on a baking sheet lined with parchment paper, flattening each ball slightly into a disc shape.
Bake in the preheated oven for 10-12 minutes, or until the edges are set but the centers are still soft.
While the taco shells cool, combine the whipped cream and chocolate chips in a bowl. If using peanut butter, fold it into the mixture.
Once the chocolate taco shells have cooled completely, fill each shell generously with the whipped filling.
Drizzle your chocolate or caramel sauce over the filled tacos, then sprinkle with your choice of toppings.
Recipe Reviews
- ★★★★★
Excellent recipe!
Leave a Reply
Your email address will not be published. Required fields are marked *


Excellent recipe!